|
Step 1:
Configure folders and open editor BlockNote
 |
|
| A - The first time you run DM-D, you must define a "Working
Folder", in which DM-D stores all the files to work with. You must also
create a "Project Folder", in which you will save the files of your musical
piece. You can do this through the menu: Options --> Folders. The following
window will appear:
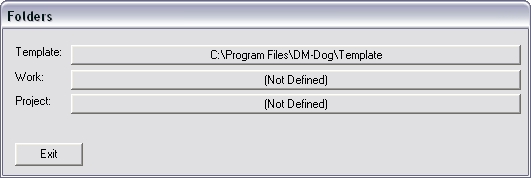
- By clicking on "Work", and then in "Project" you will create new
folders. You can name your folder in anay way you wish. In this example we will use "DMDFiles"
for the work folder and "Piece01" for the project folder. We close
by clicking "Exit". Now the program window will incorporate our folder names:
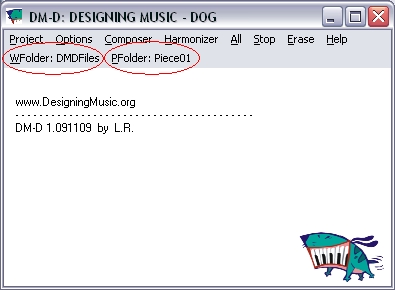
B - Now, you must load a new project. To do this go through the menu:
Project --> New. A dialog box appears requesting you to confirm. Click yes,
and the DM-D screen will display the message New Project Loaded.
C - Clicking on the menu option "WFolder" a File Explorer window will
open showing the contents of the Working Folder. You must now open the
worksheet Composer, which is the file "incom.htm" (may not appear "htm").
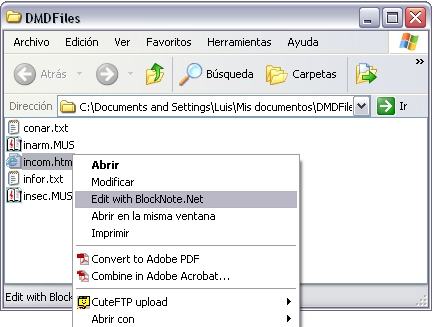
By clicking on the file with the right mouse button, it will appear the
option "Edit with BlockNote.Net" which you will select. BlockNote should
open. If this does not happen, you would have to open the program through
the Windows Start menu, and then open the file "incom.htm" from BlockNote. |
|
Step 2: Write your first
Composer "program"
|
|
| - The Composer Programming Sheet (which is the file "incom.htm")
contains a series of tables through which you pass "orders" of composition
to DM-D. Composer works on the principle of generating events, i.e., musical
notes. In this first example you will use the table "WAVE GENERATORS". To
define your first generator you just have to write any name in the first
column of the table. For example "Gen1":
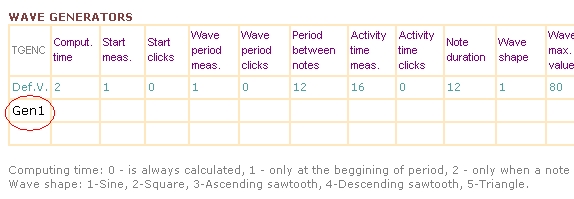
- You have defined your first generator. All other parameters of the generator,
which by now are blank, will take their value from the default blue 1st row.
You can now assign this generator to the output. To do that, you must use
the "OUTPUT TABLE", writing the following:
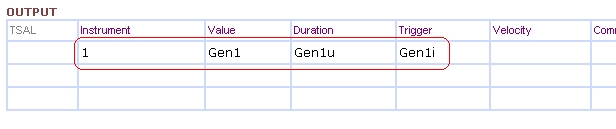
- The meaning of these values is as follows. Each note produced by the
generator is associated with 3 variables:
- The name of the generator, which is the output value and contains the
pitch of the note (in the output table this value must be between 0 and
127, which are the MIDI values for pitch).
- The name of the generator by adding the letter "i", that defines the
trigger time of the note (a new note begins when its value is not 0).
- The name of the generator by adding the letter "u", which defines the
note duration (in clicks).
- For Instrument, write the MIDI channel (1 to 16) in which the notes
are generated. For now, type 1.
VERY IMPORTANT: Finally, as always, when you make any changes, you must save
the file in BlockNote File --> Save. |
|
Step 3: Create your first
piece
|
|
| - Now, you has just to order Composer to write the piece. To
do it, you must click on "Composer" option, in the menu. The program begins
to work, showing mesages in the screen. After finishing, the result are 2
files, into the Working Folder (DMDFiles), named "outco". One of them is a
MidiFile, which you can open with any music editor (Finale,
Sibelius, ...).
If you open the file with the editor, it must show something like this: 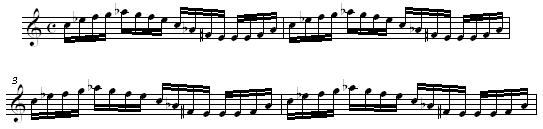
- As you can see, it is a kind of wavy scale of 15 measures length. It is
not the brightest musical work, but in the following steps we will study how
to make it more interesting. |
|
Step 4: Adding a Second Voice
|
|
| - We will create now an accompaniment to our previous
melody. To do this, declare a second generator writing Gen2 in the next row,
just below the Gen1. In addition, add the values you see in the other
columns:
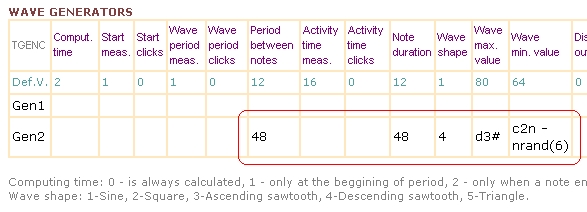
- What do these values mean? It is described below:
| - Period between
notes = 48 |
The separation of the
notes is 48 clicks, ie, exactly one quarter. |
| - Note duration = 48 |
The same, notes are one quarter long. |
| - Wave shape = 4 |
The waveform is a
sawtooth, ie continuous decline, unlike the 1st voice, which is a
Sine (undulation). |
| - Wave max. value = d3# |
The maximum value of the wave is Re#,
in 3rd octave. |
| - Wave min. value = c2n - nrand(6) |
The minimum value of
the wave is Do natural, in 2nd octave, less a random value from 0 to
6 semitones. |
- Now, as we did with Gen1, you must assign this generator to the output
in the OUTPUT TABLE. But this time you are going to generate two
simultaneous notes. How? Declaring 2 times the output:
(You may need to add rows to the table. To do this click with the mouse
in the right corner outside the table, and press Enter)
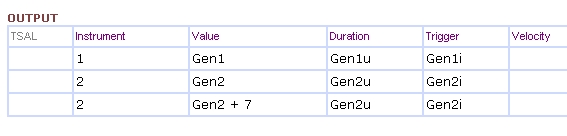
- First time, as it comes from Gen2
- Second time, we add 7 semitones to Gen2
- Just as you did in Step 3, save the changes in BlockNote, order DM-D to
compose and open the outco(.mid) file in a music editor. For proper viewing,
the music editor should assign each midi channel to a different staff. In
Finale, for example, this is done in the MIDI menu option --> Import MIDI
File Options --> Chanels become staves. You should see something like this:

- Now the second staff appears. The first notes in each measure are
always the same, Eb and Bb, but the others are changing. This is due to the
random value that you have assigned to the minimum value of the wave. |
|
Step 5: Getting a more
interesting melody
|
|
| - We will add new values to obtain a more interesting melody,
which currently is very repetitive, and to learn new features of Composer:
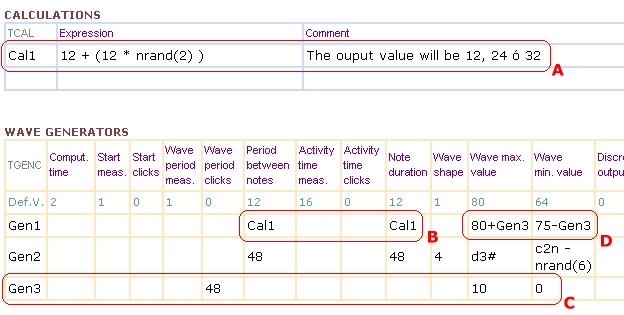
- First, add the boxed values in A. With these values, we are
using a new table: the Calculations, which lets you assign a calculated
value to a variable, named in this case as Cal1. This value is assigned to
Gen1 in cells boxed by B, which control the duration of its notes.
With all this what we get is that Gen1 notes change ramdomly between a
sixteenth, a dotted eighth or a quaver.
- Secondly, we use a powerful functionality of Composer: a generator
which is used only to modify another generator. That will do Gen3, defined
in Box C. Its output values are between 10 and 0, and has a period of
1 measure plus 1 quaver.
- Gen3 values will affect Gen1 through D boxed expression. What
they are going to do is alter its maximum and minimum wave levels, getting
to be "mobile" over time. Now, we are ready to order DM-D to compose, but
first remember to save the file in Blocknote!
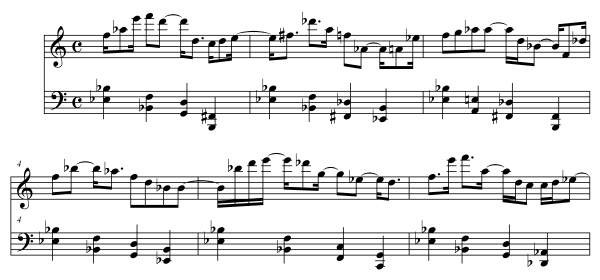
- The resulting piece should be something like this (not equal because of
random values). As shown, now the melody durations vary randomly between
sixteenth, eighth and dotted eighth. The high and low level of the meloly
change, too. Again, it is interesting to try to modify any of the parameters,
and check how they affect the music produced by DM-D. - Here ends Tutorial
1. We strongly recommend going to Tutorial 2.
It is really easy and you will acquire good knowledge about most features and
potential of DM-D. |
|
|
|
|